


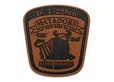


Custom Cloisonne Pins
The deep colors and high-gloss finish of these pins are sure to grab everyone's attention.


Are you Looking for Cloisonne Pins?
Look no further, our cloisonne pins are custom made with your design using this 13th-century process. They are created using an ancient metalworking technique developed in the far east. A multi-step process that remains relatively unchanged today. The technique results in a jewelry-like finish that far exceeds that of other types of lapel pin processes. For this reason, cloisonne is the preferred type of hard enamel for designing pins.
Get noticed with cloisonne pins! Their unique, vibrant look and smooth finish set them apart from other options like die struck and soft enamel. Plus, you can choose from up to 200 colors for your design--from solid pigment to transparent hues--to really make a statement at corporate events or special celebrations. Show off logos and lettering in style: don't settle for dull party favors when you have the option of stylish lapel pins!

What is cloisonne?
Cloisonne is one of the most popular styles we make, but what is it? Developed in the Far East, this technique has become a popular way to finish pins and coins today. Similar to the process used to make die struck and soft enamel pins, these pins use a stamp to print a design onto a sheet of metal. Then, instead of finishing the pin or coin with normal enamel, the recessed areas of the pin or coin are filled with colored powdery glass. This gives the pins or coins a hard and glossy finish similar to the shine of jewels.
Cloisonné pins are decorative pins made using the ancient technique of cloisonné, in which thin metal wires are soldered to a metal base to create compartments, which are then filled with enamel and fired at high temperatures. The result is a colorful and intricate pin that can be used for various purposes such as lapel pins and tie pins. They come in different shapes, sizes and designs, and can be used for both decorative and functional purposes.


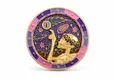
Jewelry-like hard enamel
with exceptional durability!


What is the difference between hard enamel and cloisonne?
This ancient technique first starts with die striking metal blanks creating recessed areas in the metal. Color is added until filled perfectly to the edge of the metal. The firing process is very labor-intensive, as they have to be filled and fired repeatedly until the desired look is achieved. The same process is used with hard enameling accept they fired the same way. Hard enamel is put into an oven and heated until cured. Both styles resemble each other but the big difference is hard enamel pins can match logo colors.


Cloisonne is a classic finish that has been loved for centuries by collectors and organizations alike. With its timeless beauty, cloisonne adds vibrancy to any pin or coin design — catching eyes everywhere! Not only does it bring attention to your cause but helps create discussion about it; perfect for non-profits looking to gain some publicity. After all, success comes from maintaining visibility in the public eye!
This style of pin is made the same way soft or hard enamel pins except for how the color is added to the bare metal of a pin. Made from glass and is added to the recessed areas of a lapel pin in a paste form. Hard fired to 1880 degrees these pins become hard as glass.
Also known as hard enamel or epola, was originally started thousands of years ago by the Chinese. It involved creating a grid on a bronze or brass plate. The grid is then filled with hard enamel glass and fired to melt the colored glass. The process is repeated until the grid is full. The piece is then ready for polishing. The process today is still done in a similar fashion and is generally the most expensive type of lapel pin made. It is dye-stamped today to create the grid with the separator lines and recessed areas stamped into the metal. Today copper used in place of bronze or brass.
How are cloisonne pins made?
Cloisonne lapel pins are in the die struck family of pins. The technique used to produce them is an unparalleled and revered art form. Designs are first die-struck into a copper or metal base, creating cavities. The cavities are filled entirely by hand with the Cloisonne enamel of your choice. Colors are made from a pigmented sand exclusive to Cloisonne and must be determined using a color chart. The pins are then fired at about 1,700 degrees Fahrenheit, effectively turning the colored sand to glass. Unlike hard enamel pins, this color fill cannot be overfilled and sanded down, thus the cavities will be filled and fired repeatedly until completely filled. Finally, the lapel pins are polished, plated, and sent to you.
Step 1
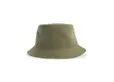
Whether you're a fan of classic baseball caps or hip snapbacks, there's something for everyone in our selection! Choose from custom designs and varied styles like visors, boonies, beanies and fitted hats. With options ranging from seamless fronts to six panels and lifeguard-style brims – your perfect custom hat awaits!
Step 3
The cloisonne powder is mixed with a liquid to create a paste-like mixture. The first color is filled into the specific recessed areas restricted by the "dividing walls" so that there is no "bleeding" or "running" of colors together.
Step 5
Each color is filled in its specified area and fired before the next color is filled.
Step 7
The excess pigments (now hardened from the firing) are ground away by hand using a pumice stone wheel. Each piece is polished down to the level of the base metal (see the use of the base metal as "dividing walls", detail, and lettering).
Step 2
Each copper or bronze piece is then cut to the exact outline of the design. This is accomplished by making the cutting dies or piercing tools if a center hole cut is required.
Step 4
Each piece is fired at nearly 1700 degrees F in order to melt the powdered Cloisonne paint.
Step 6
Although step 6 appears as if there is bleeding of color together, the colors do not run together because the firings harden the pigments to prevent any other colors from entering the recessed area.
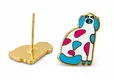
Step 8
Each piece is polished a final time with a softer polishing wheel in order to bring out the highest degree of luster and smoothness.
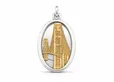
Step 9
The final step, before packaging, is plating. Each piece is attached to the "hanging tree" which is dipped into the specified plating material (gold or silver). The plating adheres to the exposed base metal thus converting all of the "dividing walls", detail, and lettering to gold in the example shown.